The benefits of no-cook backpacking meals
Are you trying to save ounces in your pack? Do you want to save money on food while backpacking? No-cook backpacking meals are the ideal answer for hikers looking for a lightweight, simple way to prepare a meal. They include a wide range of tastes that will keep your taste buds occupied on the journey. Here’s how to make them at home yourself!
What are no-cook backpacking meals?
No-cook backpacking meals are pre-packaged, lightweight meals that you can prepare without using any heat. They’re perfect for backpackers who want a quick and easy meal without all of the fuss.
There are all sorts of different no-cook backpacking meal options on the market, so you’re sure to find something that suits your taste buds. Some popular options include cold cereal, trail mix, fruit bars, and granola bars.
One of the best things about no-cook backpacking meals is that they’re incredibly easy to prepare. All you need to do is combine the ingredients in a lightweight container and you’re good to go. No cooking required!
Another great thing about no-cook backpacking meals is that they’re incredibly lightweight. This makes them a great option for backpackers who are looking to save on weight.
What are cold soak backpacking meals?
One type of no-cook backpacking meal is cold soak backpacking meals. As the name suggests, these meals require you to soak them in cold water before eating. This helps to soften the ingredients and makes them easier to eat.
Cold soaking is very easy to do – simply combine the ingredients in a lightweight container and add cold water. Let them soak for a few minutes (or hours, depending on the meal) and you’re good to go!
Cold soaked meals are very convenient. Your meal is being prepared while you hike, so there’s no need to stop and cook.
A cold soak backpacking meal is a great way to refuel after a long day on the trail.
How long do I have to cold soak my backpacking meal?
It varies from meal to meal, but most cold-soaked backpacking meals require at least an hour of soaking time. So, plan ahead and start soaking your meals early on in your trip. That way, you’ll be ready to eat when it’s the time!
Cold-Soaking Tips and Tricks
Here are some methods for obtaining the best results.
Timing your cold-soak meals
The time it takes to cook without actually cooking is extremely important. Some meals take longer to absorb than others before they become edible; this must be taken into account when planning a meal. Some hikers prefer to cold-soak Knorr Sides for a long period of time, which takes a significant amount of time. Ramen noodles need about an hour to hydrate properly. A good rule of thumb is one hour, but it may take more than that on rare occasions.
Choosing a Cold-Soak Jar/Container
Selecting a cold-soak container is an important step in the cold-soaking process. A good cold-soak jar has dual purposes: to store the meal and to provide insulation while the food soaks. The best cold-soak containers are made of materials that will not absorb the flavors of the food or leach chemicals into it, such as hard plastics or metals.
One quart Mason jars work great for cold-soaking meals, as they are lightweight and have an airtight seal. You can also find specially designed cold-soak containers on the market, which have a built-in strainer and measuring marks.
Adding cold water
Another common question is how much cold water to add to a cold-soaked meal. You want to ensure all the food is covered in water, but you don’t want so much that the food will float. You may want to shake the container a bit to help ensure all the food is wet.
How to make no-cook backpacking meals at home
Making no-cook backpacking meals is easy. All you need is a stove or microwave, and some basic ingredients. Here’s how to do it:
1. Start by gathering your ingredients. You’ll need a pre-packaged meal, water, oil or butter, and any optional ingredients you might want to add.
2. Pour the contents of the pre-packaged meal into a bowl.
3. Add water, oil or butter, and any optional ingredients you might want to add.
4. Stir until the ingredients are well combined.
5. Pack the mixture into a sealable container.
6. Label the container with the name of the meal and the date it was made.
7. Store in a cool, dry place until you’re ready to take it on your trip.
The benefits of no-cook backpacking meals over traditional campfire cooking
No-cook backpacking meals have a lot of advantages over traditional campfire cooking. Here are a few:
1. They’re lightweight and easy to transport.
2. They’re easy to prepare, even for beginners.
3. They don’t require any special equipment or ingredients.
4. They come in a variety of flavors and textures to keep your taste buds entertained.
5. They’re sanitary and safe to eat.
6. They’re affordable and can save you money on food costs.
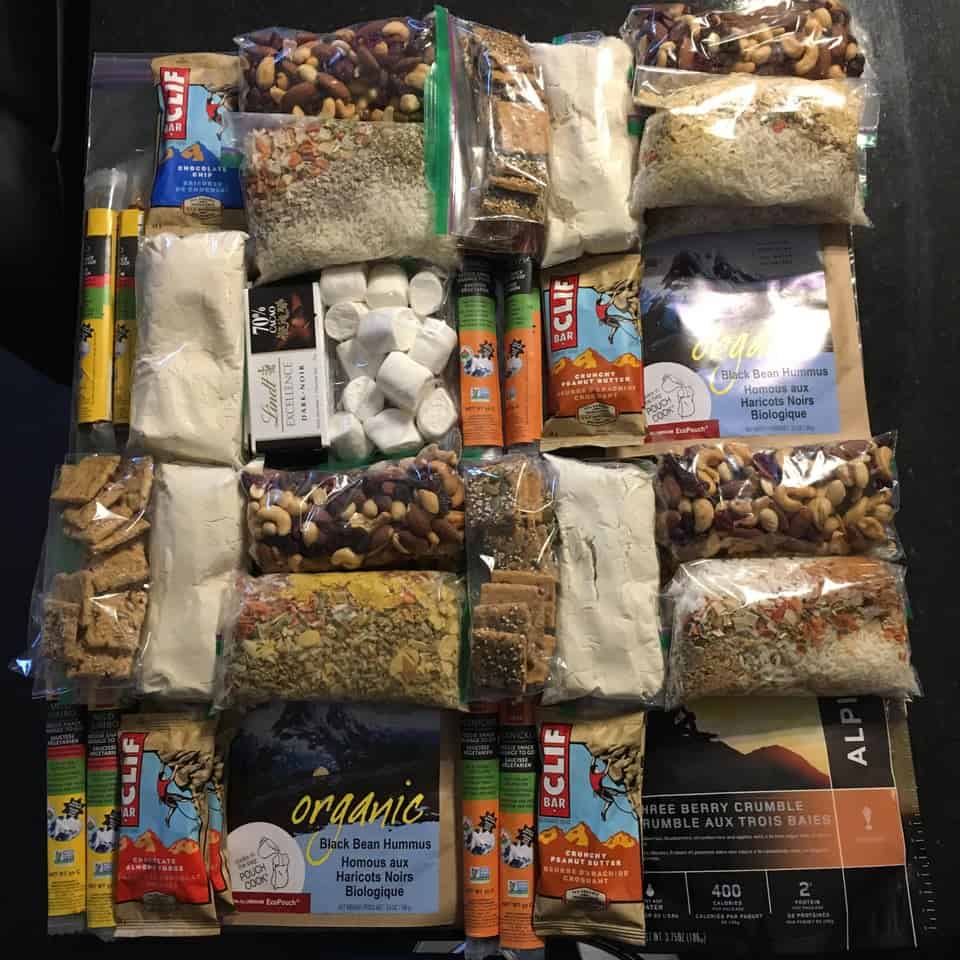
Cold soak staple ingredients
These ingredients are the foundation of many cold-soaked backpacking meals. Ramen noodles, macaroni and cheese, and instant mashed potatoes are all examples of cold-soak staples. They’re affordable, lightweight, and easy to find in most grocery stores.
These ingredients can be combined with a variety of flavors to create a variety of cold-soaked meals. For example, you can add dehydrated vegetables, meats, or sauces to ramen noodles to make a hearty meal. Or, you can add canned tuna or salmon to macaroni and cheese for a protein-packed meal. The possibilities are endless!
Here is a list of common staples:
- Ramen noodles
- Macaroni and cheese
- Instant potatoes
- Dehydrated vegetables
- Dehydrated meats
- Tuna packet
- Dehydrated beans
- Freeze-dried fruit
- Powdered milk
- Breakfast oats
- Instant rice
- Olive oil
- Protein powder
- Dehydrated meat
- Beef jerky
- Nut butter
- Hard cheese
- Tortilla chips
- Milk powder
- Chicken packets
- Instant coffee
- Energy bars
With these ingredients, you can create a variety of cold-soaked meals that will keep you fueled on your next backpacking trip. Experiment and have fun with it!
Recipes for some delicious no-cook backpacking meal ideas
Here are a few recipes for some delicious no-cook backpacking meal ideas:
1. Spicy Thai Noodle Bowl: This flavorful dish is made with rice noodles, shrimp, peanut butter, and sriracha sauce.
2. Southwest Quinoa Salad: This salad is packed with protein and flavor, thanks to the inclusion of black beans, corn, tomatoes, and avocado.
3. Mediterranean Couscous Salad: This salad is light and refreshing, with a delicious mix of cucumbers, tomatoes, olives, and feta cheese.
4. Indian Curry Lentil Soup: This hearty soup is perfect for cold-weather camping trips. It’s made with lentils, onions, tomatoes, and spices.
5. Classic Granola Bars: These bars are a classic camping favorite, and they’re easy to make at home with just a few simple ingredients.
6. Crunchy Peanut Butter and Jelly Sandwich: This old-school favorite is perfect for a quick and easy meal on the go.
7. Cheese and Crackers: A simple cheese and crackers snack is a great way to fuel up for a long day of hiking.
8. Fruit Salad: A healthy and refreshing fruit salad is the perfect light meal for a hot summer
9. Trail Mix: This healthy and filling snack is perfect for backpacking trips. Just pack a variety of nuts, seeds, and dried fruits.
Benefits of cold soaking and stoveless backpacking meals
There are a number of benefits to cold soaking and stoveless backpacking meals.
Save weight
One of the biggest benefits of cold soaking and stoveless meals is that they save weight. By foregoing cooking gear and ingredients, you can save a lot of weight on your backpacking trip.
Simplicity
cold soaking and stoveless meals are simple to prepare, even for beginners. You don’t need any special cooking skills or equipment to make them.
Cleanup
cold soaking and stoveless meals also have the advantage of being easy to clean up. There is no cooking gear to haul home with you, and no dirty pots and pans to deal with.
No worry about enough fuel
Another advantage of cold soaking and stoveless meals is that you don’t have to worry about bringing enough fuel with you on your trip. You can easily cold soak or cook your meals without any additional fuel.
Save Money
Cold soaking and stoveless meals also tend to be more affordable than cooking meals on a backpacking stove. Dehydrated backpacking meals can get very expensive for large groups or multi-day adventures. You can save money by using simple, inexpensive ingredients.
Less smell to attract animals
Finally, using the cold soak method and stoveless meals have the added benefit of emitting less smell than cooking meals on a stove. This can be helpful in avoiding unwanted attention from animals while you’re camping.
Less waste
Another benefit of cold soaking and stoveless meals is that there is less waste produced. You will not be bringing as much packaged food into the backcountry and there will be less to pack out.
Tips for ensuring your no-cook backpacking meals are safe and sanitary
To ensure that your no-cook backpacking meals are safe and sanitary, follow these tips:
1. Use fresh, high-quality ingredients.
2. Wash your hands thoroughly before preparing your meals.
3. Make sure all of your equipment is clean and sanitized.
4. Use a food thermometer to ensure that your food is cooked properly.
5. Store your meals in a cool, dry place.
6. Discard any unused food after your trip.
No-cook backpacking meals are the perfect way to enjoy a quick and easy meal on the trail. They’re lightweight, easy to prepare, and come in all sorts of delicious flavors. Plus, they’re sanitary and safe to eat, making them a great choice for backpackers of all ages. So, next time you’re planning a backpacking trip, be sure to pack a few no-cook backpacking meals for a hassle-free dining experience.